


As a machinist, my world is one of subtraction. I spend my days in a shower of metal chips, staring at a CAD model on one screen and a spinning block of metal in my mill on the other. My job is to take a "blank"—a raw, unfinished piece of material—and carve away everything that isn't the final, precise part.
But I learned a long time ago, the hard way, that the quality of my finished part is almost entirely dictated by the quality of the blank I start with. You can't machine a $0.001"$ tolerance from a block of metal that's full of hidden voids. You can't get a mirror finish on a part that's laced with sand inclusions.
That’s why I’ve had to become just as much an expert in foundry processes as I am in G-code. And in a high-tech world of 3D printing and 5-axis milling, I find that the most versatile, powerful, and cost-effective process for many of my jobs is also one of the oldest: sand casting.
I know what some engineers think. They hear "sand casting" and think "crude," "rough," "ancient." I'm here to tell you that's a dangerous misconception. Sand casting is not a crude process; it's a foundational one. It's the workhorse of the metal casting world, the only process that can affordably take molten metal and turn it into everything from a one-off prototype to a 40-ton engine block.
For my blog at hymmetal.com, I want to take you on a deep dive into the sand casting process. We'll go from the design of the wooden pattern to the finishing process and, finally, to my CNC mill. I'll show you why this method is the undisputed king of low cost tooling, large parts, and complex geometries.
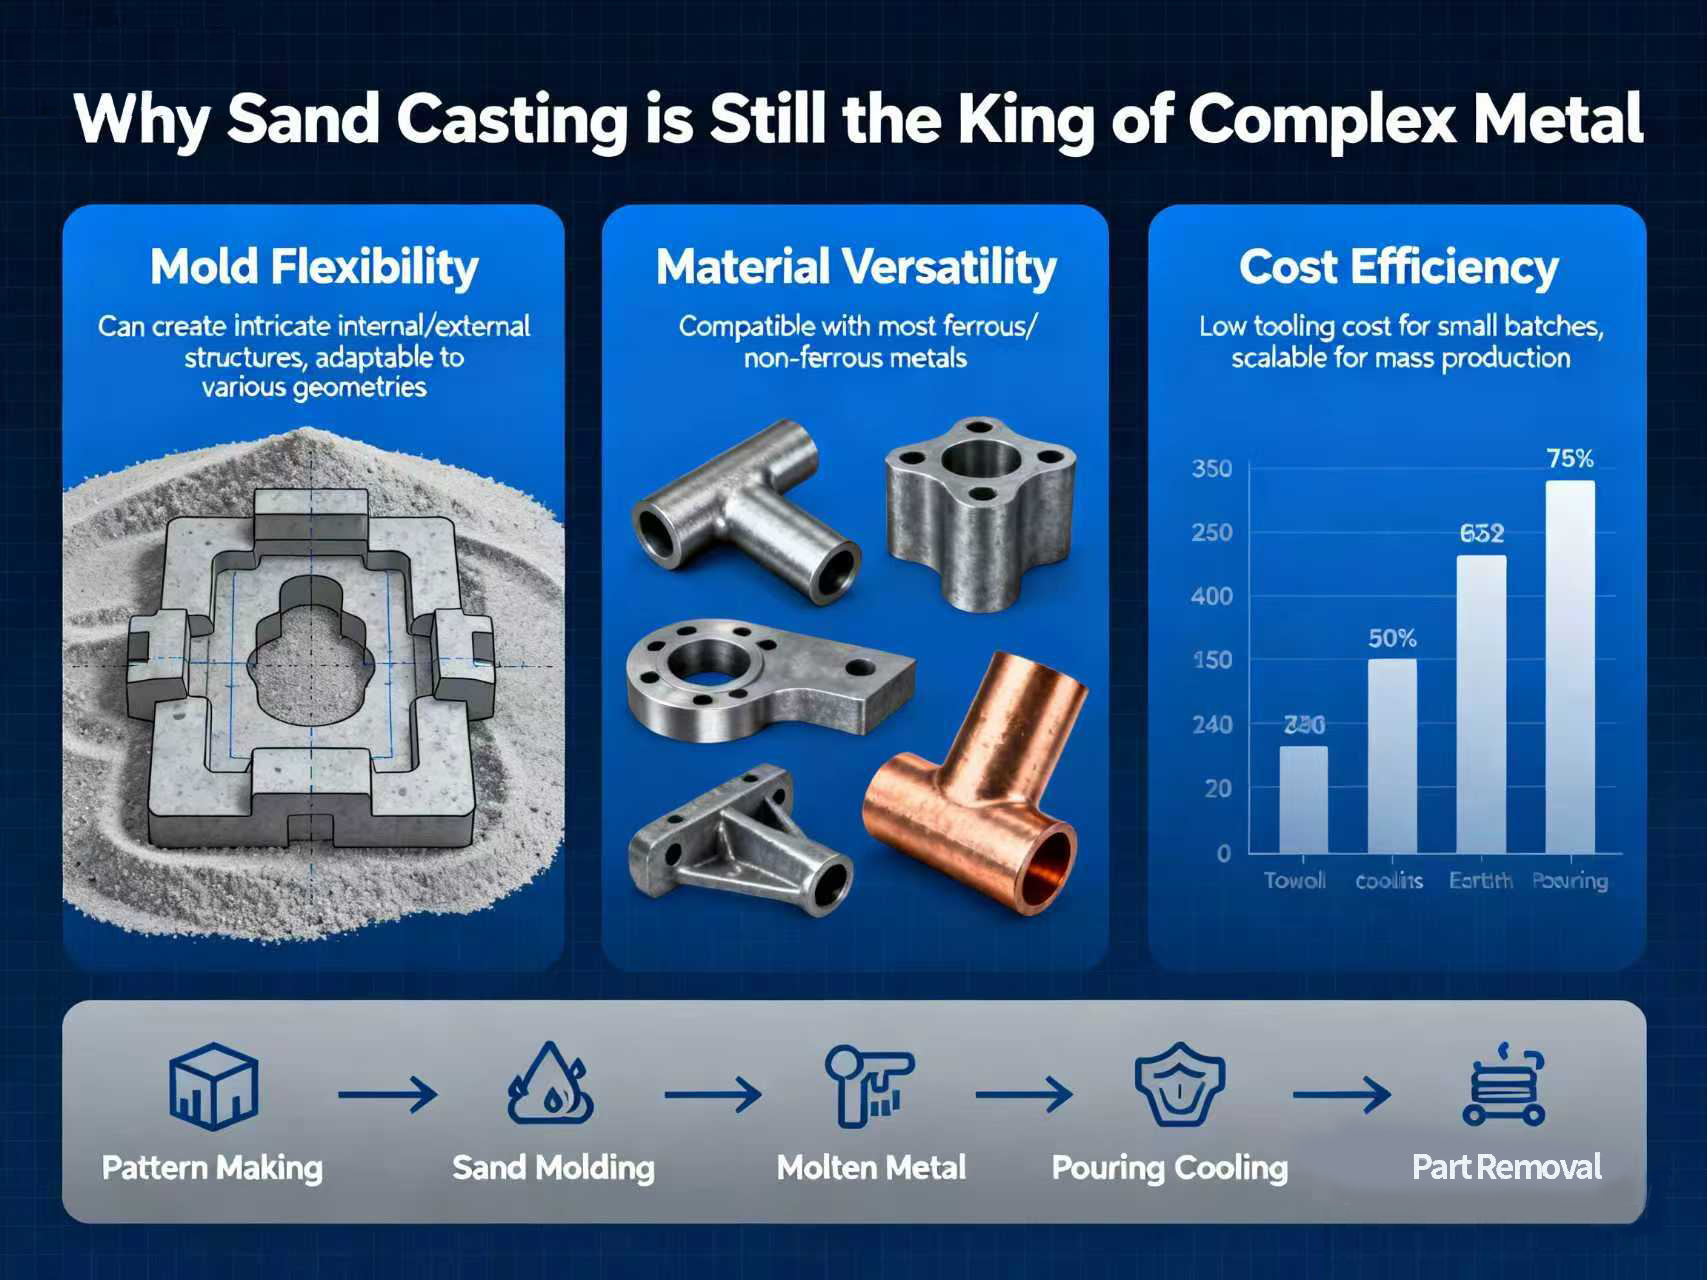
⚙️ What Is Sand Casting? The 10,000-Foot View
At its core, sand casting is a casting process that uses an expendable (meaning, one-time-use) mold made from a specialized sand mixture.
Here is the entire process in a nutshell:
-
Make a Model: A model of the final part, called a "pattern," is created (e.g., from wood or metal).
-
Pack the Sand: This pattern making is used to make an impression in a box (a "flask") packed with molding sand.
-
Make the Mold: The pattern is removed, leaving a perfect, hollow cavity in the tightly packed sand. If the part needs to be hollow, a separate sand "core" is placed inside this cavity.
-
Pour the Metal: Molten metal—like cast iron, aluminum alloys, or steel alloys—is poured into the cavity through a network of channels called a gating system.
-
Cool and Solidify: The metal cools, solidifying at high temperatures into the shape of the cavity.
-
Break the Mold: The sand mold is broken away (this is called "shakeout"), revealing the raw, newly formed metal casting.
The genius of this process, and the reason it has endured for millennia, isn't the metal; it's the sand. Molding sand is a unique material. It's cheap, it's reusable, it's "refractory" (meaning it can withstand incredibly high temperatures without breaking down), and it's "collapsible" (meaning it breaks apart easily after the casting has cooled).
This simple process is the backbone of our modern world. It’s used in the automotive industry for engine blocks, in the aerospace industry for complex housings, and for everything from pump casings to locomotive wheels.
🔬 A Deeper Look: Not All Sand Is Just "Sand"
As a machinist, the first thing I notice on a raw casting is the surface finish. A rough, pebbly surface (high surface roughness) means I have to plan for a deep "skin cut," which wears out my tools and adds to my cycle time. That finish is almost entirely determined by the types of sand and the binding agent used in the sand mixture.
When a foundry is designing your production process, they aren't just "using sand." They're making a complex metallurgical and chemical choice.
1. Green Sand
This is the most common and least expensive method. The "green" doesn't mean it's colored green; it means it's "uncured" or "wet."
-
The Mixture: This is a sand mixture of silica sand, a binding agent (almost always bentonite clay), and water.
-
My Machinist's Perspective:
-
Pro: It's cheap. The sand is incredibly reclaimable. This is why green sand casting is a go-to for low-cost, high-volume metal parts.
-
Con: The moisture is a problem. When the 1500°C molten metal hits that damp sand, it creates steam. This steam can get trapped, causing casting defects like gas porosity (tiny bubbles) in my final product. The molds are also "softer," leading to less dimensional accuracy and a rougher surface finish. I need a much larger machining allowance for green sand parts.
-
2. "Dry Sand" / "No-Bake" Molds (Resin-Bonded)
This is the high-performance "hard mold" version of sand casting, and when a client can budget for it, I'm a much happier machinist.
-
The Mixture: Instead of clay and water, this process uses dry sand mixed with a chemical resin binder (like a furan or phenolic resin). The two-part resin cures at room temperature (hence "no-bake"), hardening the sand into a solid, rock-like mold.
-
My Machinist's Perspective:
-
Pro: This changes the game. The mold is rigid, stable, and strong. This means significantly better dimensional accuracy and a much smoother surface finish. The part I get has crisp edges and true-to-CAD features. This allows for more complex geometries and thinner walls.
-
Con: The resin binders are expensive, and the production process is slower. The tooling costs are the same (you still need a pattern), but the material and labor costs are higher.
-
3. Skin-Dried Molds
This is the "best of both worlds" hybrid. The mold is made with green sand, but then the foundry uses torches or a drying oven to bake and harden just the surface of the mold cavity. This gives it a strong "skin" to resist the molten metal's flow, improving the surface finish, while keeping the low cost of a green sand backing.
When I quote a machining job, I always ask what type of sand mold will be used. It directly impacts my setup, my tooling, and my cycle time.
🏭 From CAD to Casting: The Complete Sand Casting Production Process
When an engineer sends me a file for a complex part and asks, "Can you machine this from a solid block of aluminum?" I'll often say, "Yes, but it will cost you $10,000 and take 40 hours." Then I'll add, "Or, we can get it sand-cast for $800 and I'll just machine the critical surfaces."
This is where the magic happens. Let's walk through the entire journey.
Step 1: Pattern Making ("The Blueprint in 3D")
The sand mold is expendable, but the pattern is not. The pattern is the high-precision, reusable "master" of the part, and its quality defines the quality of the casting.
-
Pattern Materials: The most common material is a wooden pattern, which is easy to carve and adjust, making it perfect for prototypes and low production volumes. For higher-volume jobs, patterns are made from metal (like aluminum) or high-density urethane, which last for 100,000+ mold cycles. In the rapid prototyping world, we even 3D print patterns directly from CAD.
-
The "Allowances" (My Critical Part): A pattern is not a 1-to-1 copy of the final part. The pattern making process is an art that requires two critical "allowances."
-
Shrinkage Allowance: All metal alloys shrink as they cool. Aluminum alloys might shrink by 1.5%, while cast iron shrinks by about 1%. The pattern is intentionally made larger to compensate, so when the part cools, it shrinks down to the intended size.
-
Machining Allowance: This is my allowance. The foundry knows I need to machine the part. They intentionally add 1/16" to 1/4" of extra stock (the machining allowance) to all surfaces that I need to cut. This gives me the material I need to cut away the rough, pebbly surface roughness and the decarburized skin, allowing my tool to find "clean" metal underneath and hit the final, precise dimension.
-
-
Draft Angle: A pattern can't have perfectly vertical walls. It would be impossible to pull it out of the sand without the mold collapsing. So, all vertical faces must have a "draft"—a slight taper of 1-3 degrees. As a machinist, I hate draft angles because it means I have to mill that angled surface flat. This is a non-negotiable part of the process that must be planned for.
Step 2: Core Making ("Creating the Voids")
So how do you make hollow metal parts or parts with intricate parts and undercuts, like an engine manifold? You can't just pack sand inside the pattern.
The answer is core making.
-
A "core" is a separate, solid-baked piece of sand, created in its own mold (a "core box").
-
Before the main mold is closed, the foundry places these solid cores into the cavity.
-
When the mold is closed, the main cavity surrounds the core.
-
During the pour, the molten metal flows around the core, solidifying against it.
-
During shakeout, the part is removed, and the core (which is just baked sand) is vibrated or broken apart, pouring out of the part like sand from an hourglass.
-
This is the genius of sand casting. It's how we get impossibly complex geometries—internal channels, ports, and hollow sections—that no CNC machine could ever create in one piece.
Step 3: Molding ("Building the House for the Metal")
This is where the mold itself is made. The traditional "flask" is a two-part box:
-
Cope: The top half of the box.
-
Drag: The bottom half of the box.
The process is simple: The "drag" half of the pattern is placed on a board, the drag box is put around it, and it's packed tightly with molding sand. The whole thing is flipped over. The "cope" half of the pattern is attached, and the cope box is put on top.
But before the cope is packed with sand, the foundry adds the most important part: the gating system. This is the "plumbing" that will deliver the molten metal.
-
Pouring Basin (or Cup): A funnel-like opening where the operator pours the metal.
-
Sprue: The main vertical channel the metal drops through.
-
Runner: The horizontal channels that distribute the metal.
-
Gates: The small openings where the metal enters the part cavity.
-
Risers: These are critical. They are extra "reservoirs" of molten metal connected to the part. As the casting cools and shrinks, it pulls liquid metal from the riser. This ensures the riser becomes porous, not your expensive part.
The design of this gating system is a complex science. It controls the flow, filters out dross, and manages cooling to prevent casting defects.
Step 4: Melting and Pouring ("The Fiery Heart")
This is the most dramatic step. In the foundry, massive induction or arc furnaces melt ingots of ferrous and non-ferrous metals to their precise pouring temperature. We're talking 700°C for aluminum, 1200°C for bronze casting, and over 1500°C for gray iron, ductile iron, and steel alloys.
The molten metal is tapped into a large ladle, which is then used to pour the metal into the pouring basin of the mold. It's a high-skill, high-risk job that requires a steady hand to fill the mold quickly but without causing excess turbulence.
Step 5: Cooling and Shakeout
The part is now left to cool. This can take 30 minutes for small to medium parts or over a day for very large parts. This slow cooling is what gives many cast metals, like ductile iron, their unique grain structure.
Once cool, the mold is moved to a "shakeout" station—a large vibrating grid. The flask is dumped, and the intense vibration causes the sand mold to break apart and fall away, revealing the raw, red-hot casting. This is also when the internal cores are broken up and removed.
Step 6: The Finishing Process (What I Get in My Shop)
The part that comes out of the shakeout is not what I receive. It's a rough, spiky "tree" of metal. The finishing process (also called "fettling") is what turns it into a "raw casting":
-
Degating: The part is separated from its gating system and risers using cutoff saws, abrasive wheels, or plasma torches.
-
Shot Blasting: To remove the last bits of caked-on sand and the oxide "skin" from the heat, the part is put in a shot-blasting cabinet. It's blasted with tiny steel shot, which cleans the metal and gives it the familiar matte, gray surface finish.
-
Grinding: Finally, the spots where the gates and risers were attached are ground down (often by hand) to be flush with the part's surface.
This is the final product of the foundry and the starting material for me.
⚖️ My View from the Mill: The Pros and Cons of Sand Casting
As a machinist, I have a very pragmatic, real-world relationship with sand casting. It's a game of trade-offs.
The "Pros" (Why I Recommend It Constantly)
-
Amazingly Low Tooling Costs: This is the #1 reason. A wooden pattern for a prototype might cost $1,000. A steel die for sand casting vs die casting can be $100,000. For rapid prototyping, one-offs, or low production volumes, sand casting is the only economical choice.
-
Unmatched Size Versatility: I can't get a 20-ton press frame from a die-casting machine. Sand casting is virtually limitless in size. It's the only process for truly large parts.
-
Total Alloy Freedom: The sand mold doesn't care if you pour 700°C aluminum or 1600°C high-chrome iron. This process works for all metal alloys, including steel alloys, stainless steels, and exotic magnesium alloys.
-
Incredible Geometric Complexity: The use of core making means I can get parts with internal channels, undercuts, and hollow features that would be physically impossible to machine from a solid block.
The "Cons" (What I Have to Fight)
-
Poor Dimensional Accuracy: This is my biggest headache. A typical sand casting tolerance might be $\pm 0.030"$ per foot. This is not a precision process. I can't just "kiss" the surface; I have to take a significant cut to find my true dimension.
-
High Surface Roughness: The surface finish is a direct replica of the sand grains. It's rough (250-500 RMS is common). This is terrible for tool life and requires that all-important machining allowance.
-
It's Slow: The cycle time is measured in hours, not seconds. For high production volumes, it cannot compete with die casting. The lead times for new patterns can also be several weeks.
-
Prone to Defects: My job involves inspecting for the foundry's mistakes. I must be vigilant for casting defects:
-
Porosity: Trapped gas (steam or air) creates little bubbles in the metal.
-
Inclusions: Grains of sand break off the mold and get trapped in the metal. Hitting a grain of silica (which is glass) with a $200 carbide insert destroys the insert.
-
Shrinkage: If the risers were too small, the part will have "sinks" or voids where it "starved" for metal as it cooled.
-
Mismatch: The cope and drag were misaligned, creating a "shift" or step in the part that I have to mill away.
-
🥊 The Showdown: Sand Casting vs. Die Casting and Investment Casting
When a client comes to me, they're often confused by the "alphabet soup" of casting. Here's my simple breakdown.
-
Sand Casting vs. Die Casting:
-
Choose Sand Casting for: Large parts, low volumes (prototypes to a few thousand), low tooling costs, or if you are using ferrous and non-ferrous metals (like cast iron or steel alloys).
-
Choose Die Casting for: Small to medium parts, very high production volumes (50,000+), and when you need a great surface finish right out of the mold. But you are limited to non-ferrous (aluminum, zinc).
-
-
Sand Casting vs. Investment Casting:
-
Choose Sand Casting for: Large parts and when low cost is the primary driver.
-
Choose Investment Casting (lost wax) for: Small to medium, highly intricate parts where extreme accuracy and a near-perfect surface finish are needed right out of the mold. It’s much more expensive but gives me a "near-net-shape" part that may need no machining at all.
-
🏁 My Final Verdict: The Enduring, Unbeatable Workhorse
I've built my career on holding absurdly tight tolerances. So why do I have such a deep respect for a "low-precision" process like sand casting?
Because sand casting is the ultimate enabler.
It enables engineers in the automotive industry to design an engine block as one single, complex part. It enables the aerospace industry to create large parts for landing gear at a fraction of the cost of forging. And it enables my small-business clients to get a rapid prototype of their new invention without spending $50,000 on tooling.
My job as a machinist isn't to complain about the surface roughness or the wide tolerances of a sand casting. My job is to understand them, plan for them, and respect the incredible journey that molten metal took—from a fiery furnace, through a "plumbing" system in a box of sand, to the final product that lands on my mill.
Sand casting isn't the "old" way. It's the original way. And in many cases, it is still the best way.